Introduction to Garlic Herb Braided Bread
Why You Need This Bread Recipe in Your Life
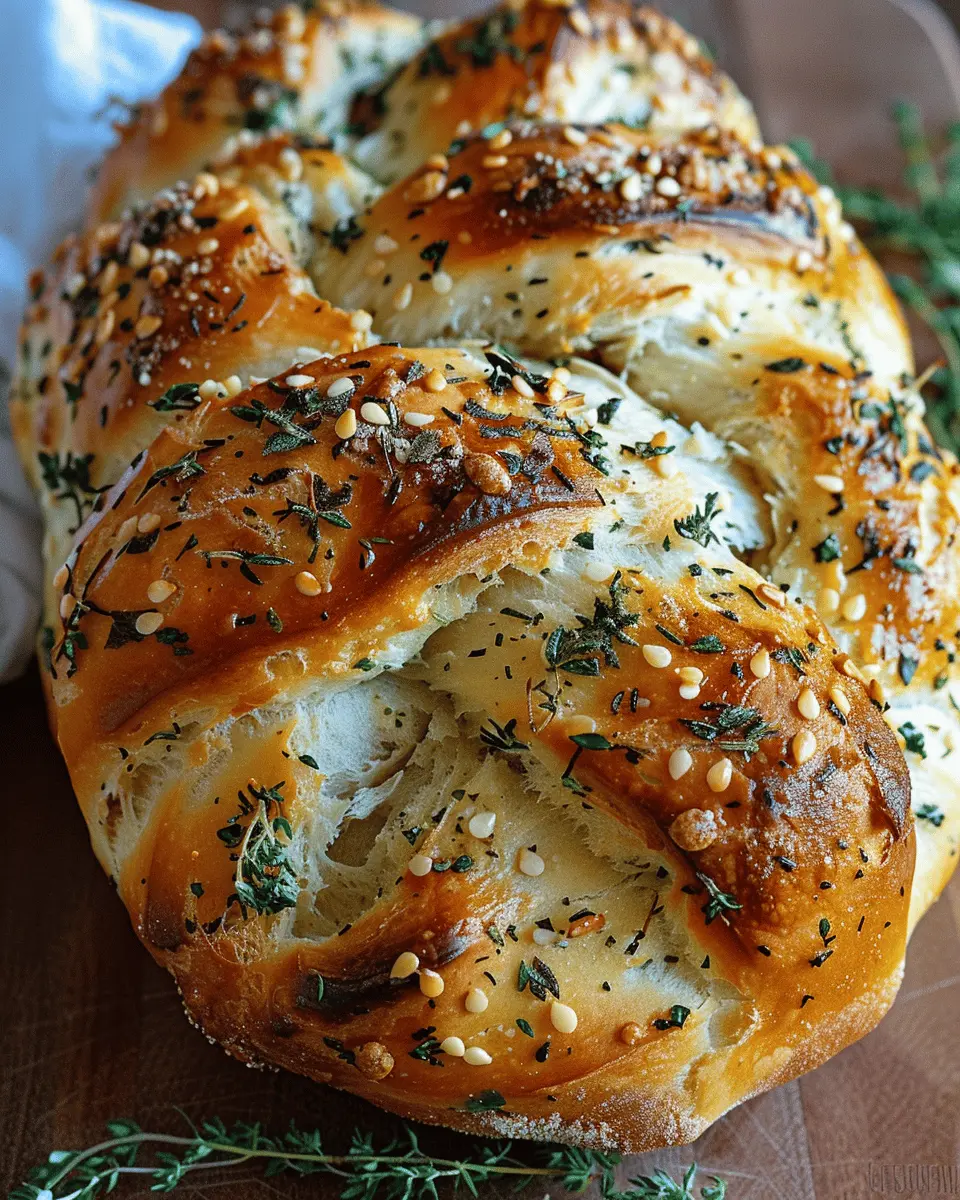
If you’re seeking a way to elevate your culinary skills while delighting your taste buds, look no further than Garlic Herb Braided Bread. This stunning, homemade bread isn’t just visually appealing; it also serves as an irresistible centerpiece for any meal. Imagine pulling a fresh loaf from your oven, the aroma of garlic and aromatic herbs wafting through your kitchen, captivating everyone in the room. It’s more than just food; it’s an experience.
Why should you add this recipe to your collection? For starters, braiding the dough creates a unique texture that’s both chewy and soft. This method allows for an incredible crust while maintaining a deliciously moist interior—making each bite pure bliss. Plus, the simple ingredients meld together in a way that brings warmth and comfort, much like being enveloped in a cozy blanket.
Another standout feature of this Garlic Herb Braided Bread is its versatility. Whether you’re hosting a brunch, looking for a scrumptious side for dinner, or craving a snack to enjoy with a warm cup of herbal tea, this bread fits the bill. It pairs well with nearly any dish, from hearty soups to light salads, and shines when served alongside spreads like hummus or olive oil.
For those on a health-conscious journey, homemade bread allows you to control what goes into it. Substitute in whole wheat flour or reduce the salt to suit your dietary preferences, ensuring you’re making a nourishing choice without compromising on flavor.
Speaking of flavor, according to the American Institute for Cancer Research, herbs like garlic have been associated with various health benefits, making this bread not just tasty but also potentially nourishing. You can find more insights into the advantages of incorporating herbs into your diet here.
In essence, Garlic Herb Braided Bread is more than a recipe; it’s a chance to create something memorable for yourself and those you love. So roll up your sleeves, and let’s dive into the delightful world of baking!
Ingredients for Garlic Herb Braided Bread
Essential ingredients for a stunning loaf
Baking a Garlic Herb Braided Bread is all about fresh ingredients that create amazing flavors and textures. Here’s what you’ll need for your loaf:
- Flour: All-purpose flour works beautifully for this recipe, providing the perfect structure.
- Yeast: Active dry yeast is crucial for that delightful rise and airy texture.
- Salt: A pinch of salt enhances the flavor of the bread, balancing the herbs and garlic.
- Water: Warm water helps activate the yeast, making it easier for the dough to rise.
- Olive Oil: Adds moisture and a lovely richness; plus, it complements the garlic and herbs perfectly.
- Garlic: Freshly minced garlic is essential for that bold flavor, but feel free to adjust based on your taste.
- Herbs: A mix of parsley, rosemary, and thyme lends the bread an aromatic quality that elevates it to the next level.
- Toppings: Consider a sprinkle of coarse sea salt or some extra herbs for a beautiful finish.
These ingredients combine to create a stunning, flavorful bread that’s perfect for sharing. Want to learn more about the art of bread-making? Check out insightful resources like King Arthur Baking for some expert tips!
Step-by-Step Preparation of Garlic Herb Braided Bread
Making Garlic Herb Braided Bread from scratch is not just a culinary skill; it’s a delightful adventure filled with aromas and textures that will ignite your senses. Grab your apron, and let’s get going!
Activate the yeast
First things first—activate your yeast. In a mixing bowl, combine about 2 teaspoons of active dry yeast with 1 cup of warm water (around 110°F). Use a thermometer if you’re unsure—it’s important not to scald the yeast. Add a pinch of sugar to help it thrive. Let this mixture sit for about 5-10 minutes, or until it becomes frothy. This bubbling reaction indicates that your yeast is good to go.
Mix in the olive oil and flavorings
Once your yeast is activated, it’s time to flavor things up! Add 2 tablespoons of quality extra virgin olive oil and stir in a mix of your favorite herbs. I recommend garlic powder, dried oregano, and a generous pinch of sea salt. Feel free to customize this mixture—perhaps some dried rosemary or basil for an extra kick! These flavorings will really elevate your Garlic Herb Braided Bread.
Form the dough
Now that your wet ingredients are seasoned, it’s time to incorporate about 4 cups of all-purpose flour. Gradually add the flour while mixing with a spatula or your hands until it forms a shaggy dough. If you want, you can also make a well in the center of your flour to pour in the wet ingredients slowly.
Knead until smooth
This is where the magic happens—kneading! Flour your countertop and transfer the dough onto it. Knead it for about 8-10 minutes until it becomes smooth and elastic. This process is crucial as it develops the gluten, giving the bread its lovely texture. You should be able to stretch the dough without it tearing. A good kneading method is to fold it over itself and push down with the palms of your hands.
Let the dough rise
Form your dough into a ball and place it in a lightly oiled bowl, turning it to coat the surface. Cover it with a kitchen towel and let it rise in a warm spot until doubled in size—this usually takes about 1 hour. If you’re short on time, a warm oven (set to the lowest setting and then turned off) makes a great rising environment.
Braiding the dough
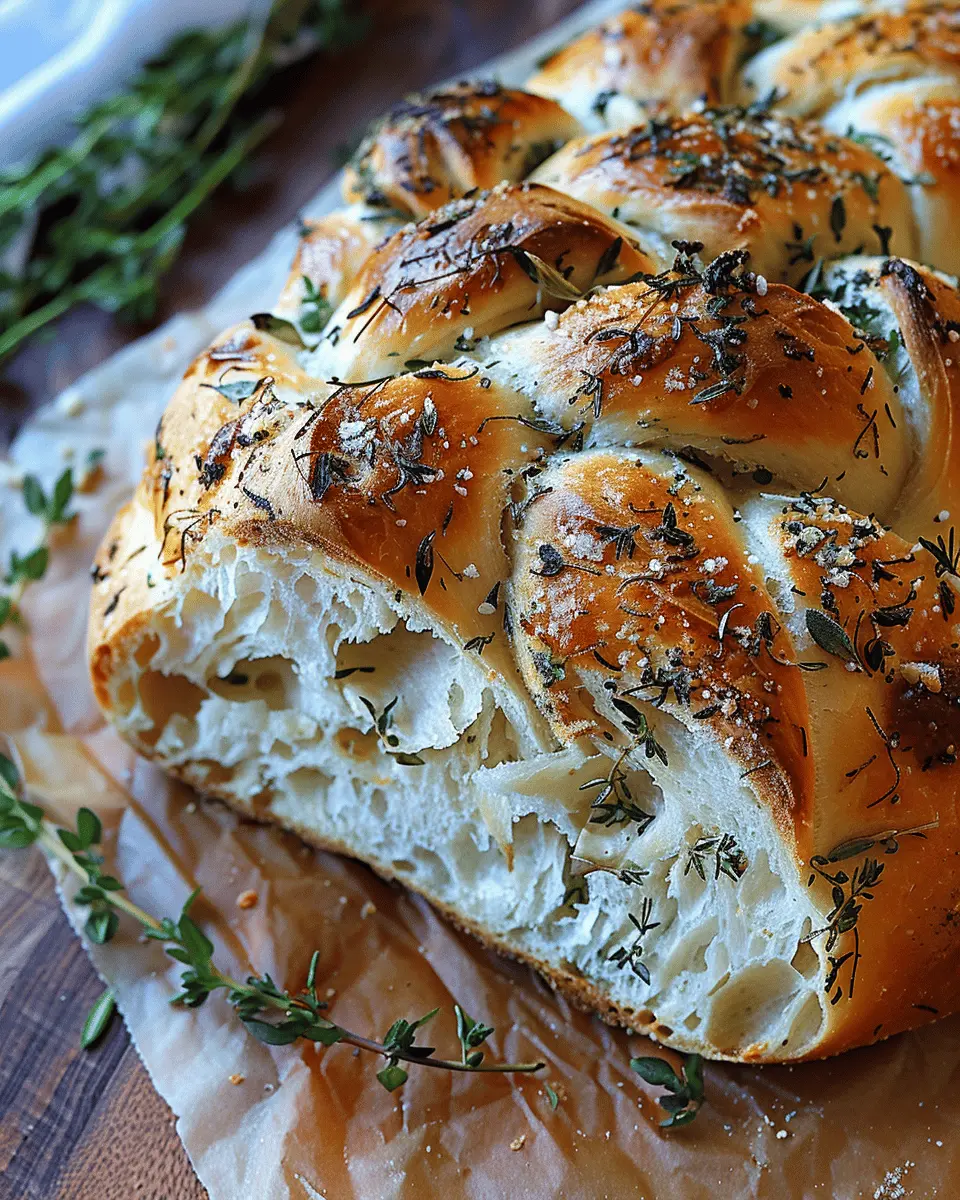
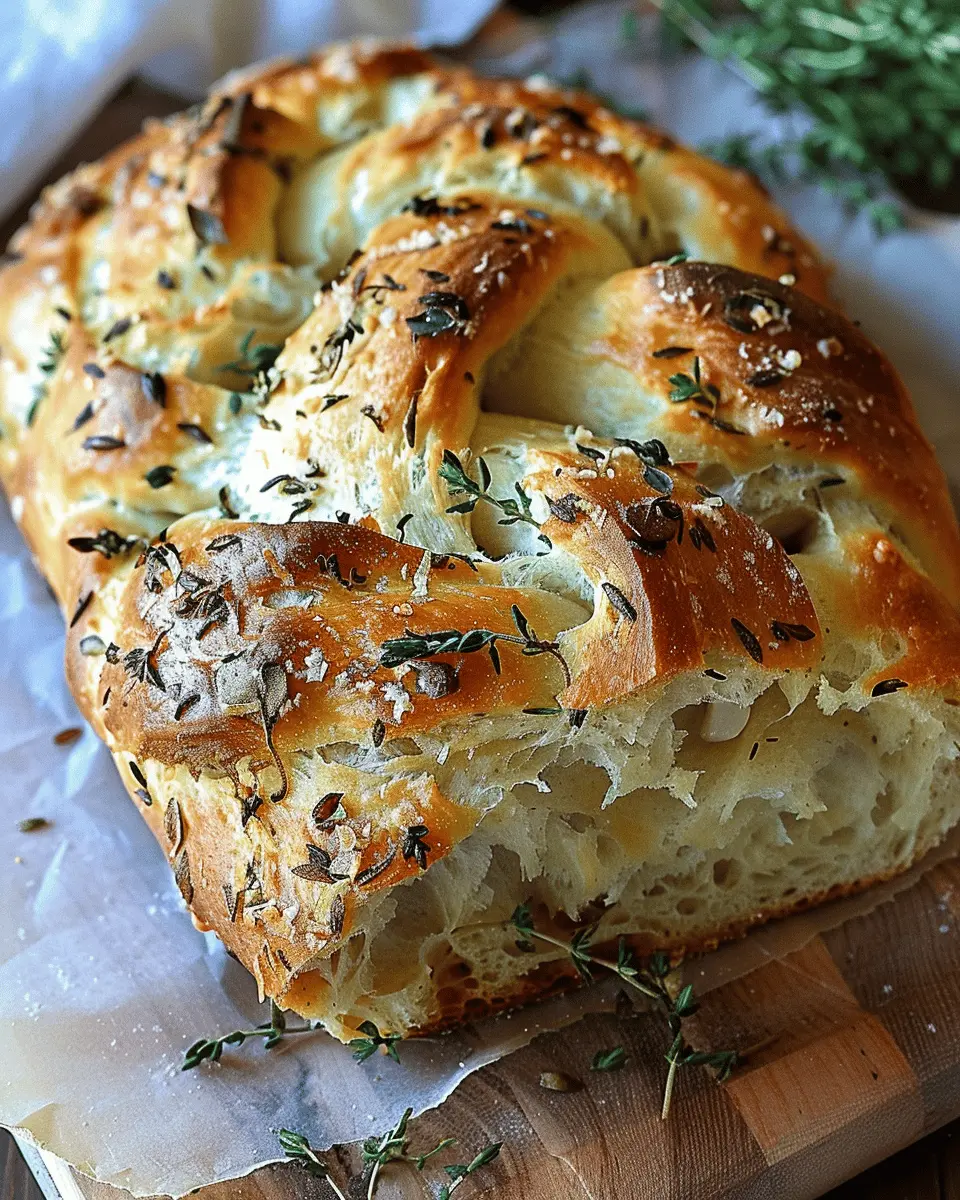
After your dough has risen, punch it down gently to release some air, then divide it into three equal pieces. Roll each piece into a long rope, about 12 inches each. Now comes the fun part—braiding! Lay the ropes next to each other and pinch the top ends together, then braid by crossing the outer strands over the middle one, alternating until you reach the bottom. Pinch the ends to secure.
Second rise
Once braided, place your Garlic Herb Braided Bread on a parchment-lined baking sheet. Cover it loosely with a towel and let it rise again for about 30 minutes. During this time, you can enjoy the enticing aroma that fills your kitchen. The dough should expand slightly, promising a soft, fluffy bread.
Prepping for the oven
Before baking, brush the top of your braided bread with an egg wash (1 egg beaten with a tablespoon of water) for a shiny finish. Sprinkle with additional herbs, sea salt, or even some cheese—your choice! Preheat your oven to 375°F.
Bake to golden perfection
Finally, it’s baking time! Place your bread in the preheated oven and let it bake for about 25-30 minutes. Keep an eye on it; you want it to be golden brown and sound hollow when tapped on the bottom. This last stage will bring all those wonderful garlic and herb aromas together, making your home feel warm and inviting.
And there you have it—your very own Garlic Herb Braided Bread! Serve it warm, perhaps alongside a hearty soup or as a base for delicious sandwiches. Enjoy your culinary masterpiece!
For more tips and similar recipes, check out resources from King Arthur Baking or The Kitchn.

Variations of Garlic Herb Braided Bread
Adding Cheese or a Spice Kick
Elevate your Garlic Herb Braided Bread by incorporating delicious cheeses or spices. Imagine biting into a warm piece of bread loaded with gooey mozzarella, sharp cheddar, or even a sprinkle of feta. Adding a cheese filling isn’t just about flavor; it creates a creamy texture that pairs perfectly with the garlic and herbs. Want a little zest? A dash of red pepper flakes or smoked paprika can add the perfect amount of heat, making your bread an irresistible companion to your favorite soups or salads.
Creating a Stuffed Bread Version
If you’re looking to make a meal out of your Garlic Herb Braided Bread, consider turning it into a stuffed bread delight. Think of filling it with savory options like turkey bacon or chicken ham. You could also add sautéed spinach or roasted peppers for a nutritious touch. Simply roll out your braided dough into a larger rectangle, spread on your chosen fillings, and then braid it as usual. This stuffed bread not only looks impressive but also makes for a filling dish perfect for gatherings or cozy dinners at home.
By exploring these variations, you can make your Garlic Herb Braided Bread a focal point on any menu. Feel free to experiment and combine different ingredients that excite you—there’s no wrong way to enjoy this globally beloved bread. For more inspiring ideas, check out The Kitchn, which offers a wealth of recipes and tips for all bakers. Happy baking!
Cooking Tips and Notes for Garlic Herb Braided Bread
Best practices for kneading and rising
Making the Garlic Herb Braided Bread is as much about the process as it is about the flavor. When kneading, ensure your hands and work surface are lightly floured to prevent sticking. Knead until the dough is smooth and elastic—usually about 8-10 minutes. For the best rise, place the dough in a warm, draft-free spot. Cover it with a damp cloth and let it double in size, which typically takes around 1-2 hours. If you’re in a hurry, preheat your oven slightly and turn it off before placing the dough inside to rise.
Storage tips for freshness
Once baked, let your Garlic Herb Braided Bread cool completely before storing it. Wrap it in foil or place it in an airtight container to maintain its softness. For maximum freshness, consume it within 3 days. You can also freeze the bread for up to 3 months—just ensure it’s well-wrapped to prevent freezer burn. When you’re ready to enjoy, thaw it at room temperature and warm it slightly in the oven for that fresh-baked taste.
For additional tips on bread storage, check out resources from reputable culinary sources like Serious Eats for expert advice.
Serving Suggestions for Garlic Herb Braided Bread
Perfect Pairings for Your Braided Bread
When it comes to enjoying your Garlic Herb Braided Bread, the options are nearly endless! It’s a fantastic companion to hearty soups, such as minestrone or a creamy potato leek. For a lighter bite, consider serving it alongside a fresh salad dressed with zesty vinaigrette. If you’re feeling adventurous, pair it with Turkey Bacon and Chicken Ham for a delectable brunch spread that combines savory and aromatic flavors. And don’t forget about your favorite spreads; consider a rich herb butter or tangy hummus to really elevate the experience.
How to Present It Beautifully
Presentation can make a world of difference! Place your Garlic Herb Braided Bread on a rustic wooden board for that charming, homey feel. You can even slice a few pieces and fan them out, showcasing that beautiful braid. Accompany it with small bowls of dip or spread to create an inviting atmosphere. A sprinkle of fresh herbs on the board adds a pop of color as well, making your dish as visually delightful as it is delicious.
For more serving ideas, check out this culinary resource that delves even deeper into pairing flavors. Enjoy your baking adventure!
Time Breakdown for Garlic Herb Braided Bread
When you’re ready to dive into the delightful world of Garlic Herb Braided Bread, knowing how to manage your time effectively can make the process enjoyable. Here’s what to expect:
Preparation time
Start by setting aside approximately 20 minutes for preparation. This includes mixing your ingredients, kneading the dough, and getting it ready for its first rise.
Rising time
Patience is key! Allow your dough to rise for about 1 hour. You want it to double in size, which is essential for that airy texture we all love. A warm kitchen will do wonders here.
Baking time
Once shaped, pop your bread in the oven for 25 minutes. This will give you that beautiful golden crust, while the garlic and herbs create a mouthwatering aroma.
Total time
From start to finish, expect around 1 hour and 45 minutes to enjoy your delightful Garlic Herb Braided Bread. Then, get ready to impress your friends and family with this savory masterpiece!
For tips on perfecting your bread-baking skills, check out this expert guide on yeast and proofing from King Arthur Baking.
Nutritional Facts for Garlic Herb Braided Bread
Understanding the nutritional profile of your favorite recipes can make a significant difference when planning your meals. Here’s a breakdown of the key nutritional facts for Garlic Herb Braided Bread.
Calories
This delightful bread offers approximately 150 calories per slice, making it a savory addition without overindulging.
Carbohydrates
Packed with flavor, each slice contains around 30 grams of carbohydrates. It’s a great source of energy for a busy day ahead while still being light enough for a healthy diet.
Protein
You can expect about 4 grams of protein per serving. Complement it with some Turkey Bacon or a side dish for an extra protein boost.
Sodium
With around 280 milligrams of sodium in each slice, be mindful if you’re watching your salt intake. Pair with fresh ingredients to keep your meal balanced.
Always consult resources like the USDA FoodData Central for more detailed info. Enjoy your baking journey and the delicious Garlic Herb Braided Bread!
FAQs about Garlic Herb Braided Bread
How can I ensure my bread comes out fluffy?
To achieve that perfectly fluffy Garlic Herb Braided Bread, it’s all about the dough! Here are some tips to ensure your bread is light and airy:
- Knead Properly: Spend at least 10 minutes kneading the dough until it’s smooth and elastic. This develops gluten, which traps air bubbles and helps the bread rise.
- Don’t Rush the Rise: Give your dough ample time to rise. A longer first rise allows for better flavor and texture. Look for it to double in size!
- Check the Temperature: Ensure your kitchen is warm (but not too hot!) for optimum rising. A cozy 75°F to 80°F works wonders.
- Use Fresh Yeast: Old or expired yeast can lead to dense bread. Fresh yeast means better rises!
What can I substitute for the herbs?
If you don’t have the particular herbs on hand, fear not! Your Garlic Herb Braided Bread can easily adapt with whatever you have. Try these substitutions:
- Dried Herbs: Oregano, thyme, or basil can be good stand-ins. Just remember that dried herbs are more potent than fresh—use about one-third the amount.
- Garlic Powder: If fresh garlic isn’t handy, garlic powder can work in a pinch—just add a teaspoon or two.
- Seasoned Salt: Consider using seasoned salt for a flavorful twist—this can also add some extra garliciness!
Can I freeze Garlic Herb Braided Bread?
Absolutely! Freezing is a fantastic way to enjoy your Garlic Herb Braided Bread later. Just follow these steps:
- Cool Completely: Let your bread cool to room temperature to prevent condensation inside the packaging.
- Wrap Well: Use plastic wrap and then aluminum foil, or place it in a freezer-safe bag to avoid freezer burn.
- Thawing: When you’re ready to eat, let it thaw at room temperature. You can also reheat in the oven for a toasty finish.
For more tips on bread storage, check out reputable baking websites like King Arthur Baking for extra advice! Enjoy your baking adventure!
Conclusion on Garlic Herb Braided Bread
Wrapping up your baking journey
As you bring your Garlic Herb Braided Bread to the table, take a moment to admire your handiwork. This bread isn’t just a recipe; it’s a delightful experience that fills the air with the warm aroma of garlic and herbs. Each twist and braid adds a personal touch, making your creation unique.
Serve it with your favorite spreads, as a side dish, or even just warm from the oven. Baking this bread is the perfect way to unwind after a long day while delivering a delicious reward to yourself and your loved ones. Want more tips on enhancing your bread-making skills? Check out resources like King Arthur Baking or Food52, where you’ll find a treasure trove of ideas to elevate your culinary journey!
PrintGarlic Herb Braided Bread: The Best Comfort Food for Home Chefs

Garlic Herb Braided Bread is a delightful homemade bread recipe that combines the rich flavors of garlic and herbs to create a beautiful and delicious loaf.
- Prep Time: 20 minutes
- Cook Time: 30 minutes
- Total Time: 1 hour 50 minutes
- Yield: 1 loaf 1x
- Category: Bread
- Method: Baking
- Cuisine: Italian
- Diet: Vegetarian
Ingredients
- 4 cups all-purpose flour
- 2 teaspoons instant yeast
- 1 tablespoon salt
- 1 tablespoon sugar
- 1 teaspoon garlic powder
- 1 tablespoon mixed dried herbs
- 1 ½ cups warm water
- ¼ cup olive oil
Instructions
- In a mixing bowl, combine all-purpose flour, instant yeast, salt, sugar, garlic powder, and mixed herbs.
- Add warm water and olive oil to the dry ingredients and mix until a dough forms.
- Knead the dough for about 10 minutes until smooth and elastic.
- Let the dough rise in a warm place for about 1 hour, or until doubled in size.
- Punch down the dough and divide it into three equal pieces.
- Roll each piece into a long rope and braid them together.
- Place the braided loaf on a baking sheet and let it rise for another 30 minutes.
- Bake in a preheated oven at 350°F for 25-30 minutes, or until golden brown.
Notes
- For extra flavor, brush the loaf with garlic butter before baking.
- This bread freezes well; just wrap it tightly in plastic wrap once cooled.
Nutrition
- Serving Size: 1 slice
- Calories: 150
- Sugar: 1g
- Sodium: 200mg
- Fat: 5g
- Saturated Fat: 0.5g
- Unsaturated Fat: 4g
- Trans Fat: 0g
- Carbohydrates: 25g
- Fiber: 1g
- Protein: 4g
- Cholesterol: 0mg
Keywords: Garlic Herb Braided Bread, homemade bread, comfort food


