Introduction to Strawberry Earthquake Cake
What is Strawberry Earthquake Cake?
If you’re on the lookout for a dessert that perfectly marries flavors with an eye-catching appearance, the strawberry earthquake cake is just the ticket. Imagine a rich and moist chocolate cake infused with delightful strawberry flavors, all topped off with a sweet cream cheese layer. This cake is more than just a treat; it’s a celebration on a plate!
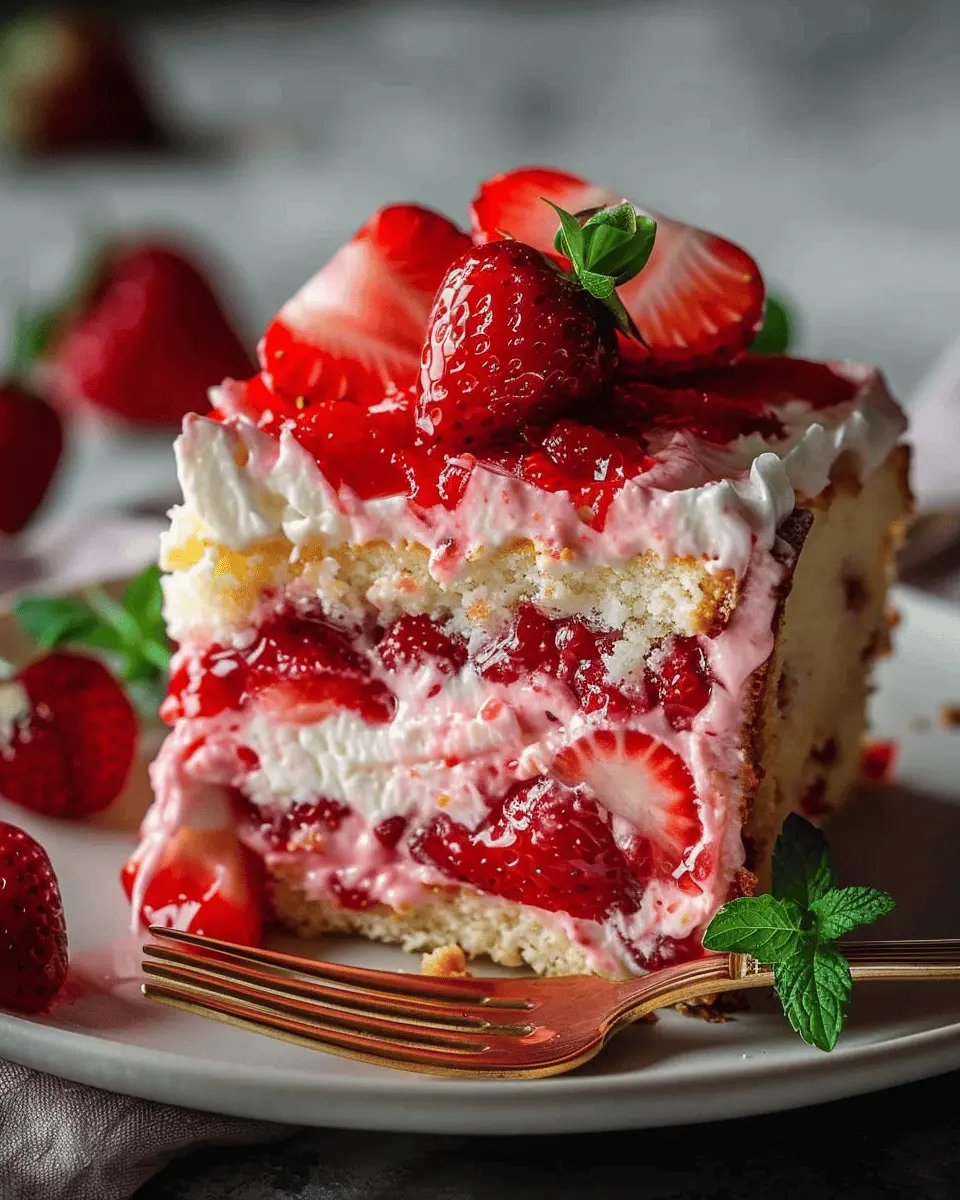
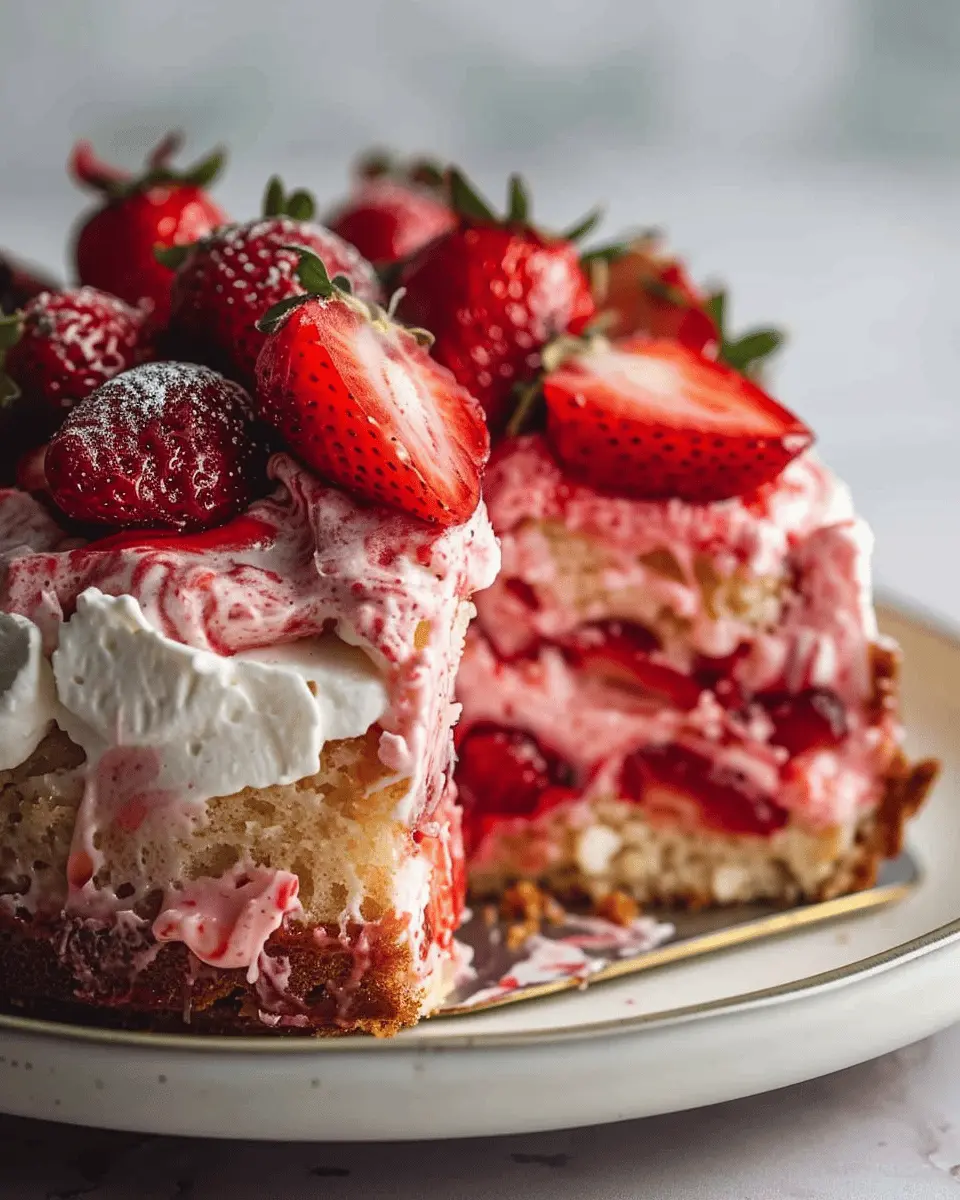
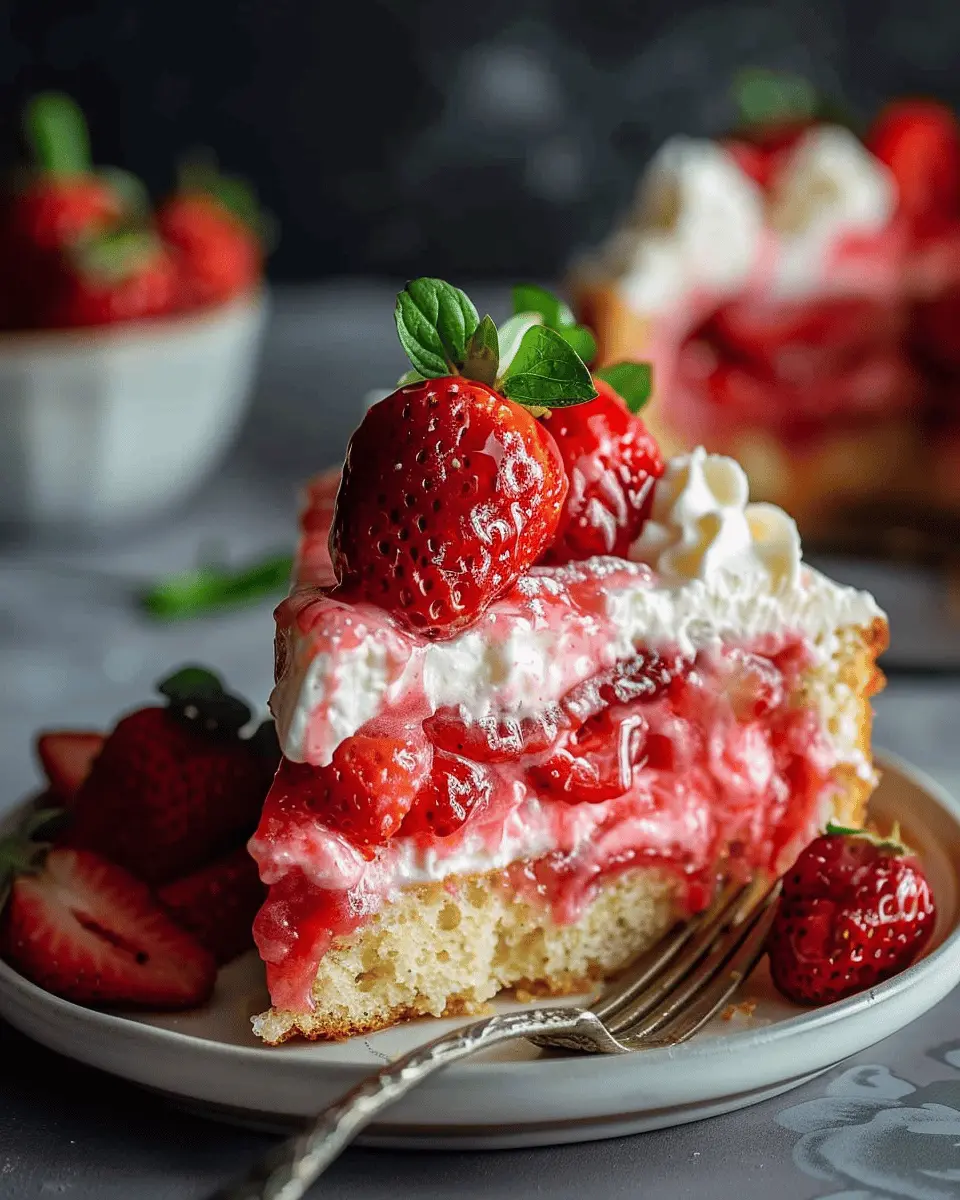
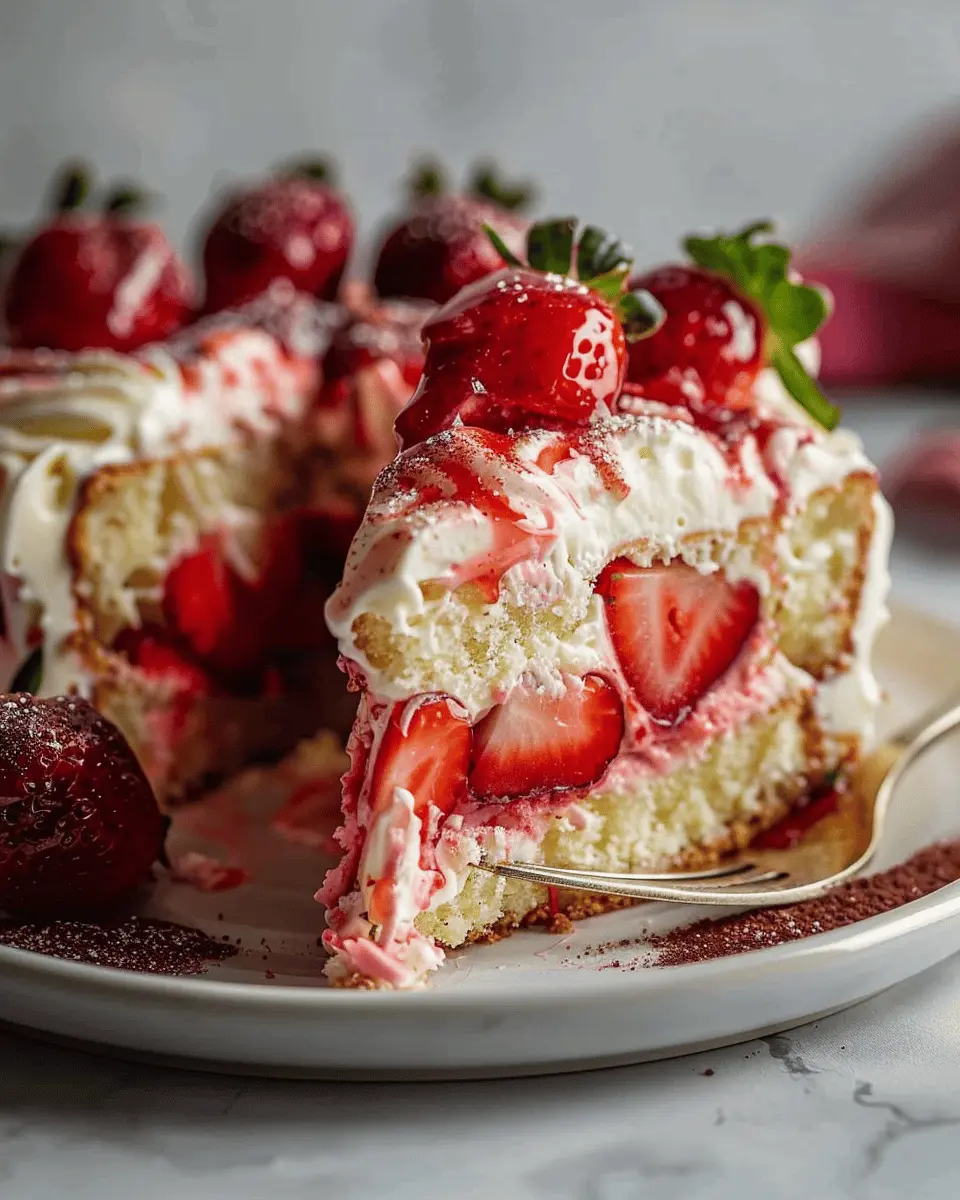
What makes it truly special is the cream cheese that creates stunning cracks as it bakes, giving it that signature ‘earthquake’ look. Adding bits of fresh or frozen strawberries elevates the cake, providing bursts of fruity freshness that contrast beautifully with the rich chocolate base. For a homemade dessert that impresses without a ton of fuss, this recipe is undoubtedly a winner.
If you’re interested in learning more about cake baking techniques, The Kitchn is a fantastic resource that offers insights on the science behind baking and tips for getting that perfect rise.
Why is it called “Earthquake”?
The intriguing name “earthquake” comes from that very characteristic look of the cake. As the strawberry earthquake cake bakes, the batter rises around the cream cheese layer, creating cracks and crevices that resemble the aftermath of an earthquake—hence the moniker!
But don’t let the name fool you; this cake is all about deliciousness. Just think—one moment you’re admiring a beautifully baked dessert, and the next, you’re indulging in a slice that’s equal parts chocolatey and fruity. It’s a great conversation starter and perfect for gatherings or simple weekends at home.
As you bake, consider how you can customize this cake. Want more chocolate? Add chocolate chips. Feeling adventurous? Throw in some nuts for added crunch. Your options are practically endless!
Whether you’re a novice baker or a seasoned pro, the strawberry earthquake cake is an inviting and fun challenge that will have everyone asking for seconds. So, roll up your sleeves and get ready to create a dessert that not only tastes incredible but also looks stunning on your table!
Ingredients for Strawberry Earthquake Cake
Essential ingredients for the cake
Creating the perfect strawberry earthquake cake requires some key ingredients that bring out the delightful flavors. Here’s what you’ll need:
- Strawberries: Fresh, ripe strawberries (diced or whole, depending on your preference) are the star of the show.
- Cake mix: A simple vanilla or yellow cake mix works wonders as the base.
- Cream cheese: This adds a rich, creamy layer that complements the strawberries beautifully.
- Sugar: Regular granulated sugar enhances sweetness.
- Eggs: Essential for binding and adding moisture.
- Vegetable oil: Keeps the cake moist and fluffy.
These essential ingredients set the foundation for your delicious creation, but why stop there?
Optional ingredients for added flavor
If you’re feeling adventurous or simply want to elevate your strawberry earthquake cake, consider adding:
- Vanilla extract: A splash will deepen the flavor profile.
- Chopped nuts: Walnuts or pecans not only add crunch but also a nutty undertone.
- Coconut flakes: For those who love a tropical twist, adding coconut can work wonders.
- Zest of lemon: A hint of citrus zest brightens up the flavors.
Mix and match these optional ingredients to create a cake that speaks to your taste, making each bite an explosion of flavor. Curious about creative ways to use strawberries? Check out this resource for more inspiration!
Preparing Strawberry Earthquake Cake
Making a Strawberry Earthquake Cake is not just about baking; it’s a delightful experience that fills your kitchen with mouthwatering aromas and leaves you with a stunning dessert that tastes as good as it looks. Let’s dive into the preparation of this unique cake, ensuring every step is straightforward and enjoyable.
Preheat and prepare the baking dish
Before you dive into mixing and measuring, the first crucial step is to preheat your oven to 350°F (175°C). This ensures that your cake rises beautifully when it hits the oven. While the oven warms up, grab a 9×13-inch baking dish and coat it with a generous layer of non-stick cooking spray or butter. For added flair, you can line the bottom with parchment paper—this makes for easy removal later and helps keep the cake intact.
Mixing the cake batter
With your oven warming up, it’s time to prepare the cake batter. In a large mixing bowl, combine:
- 1 box of vanilla cake mix
- 1 cup of water
- ⅓ cup of vegetable oil
- 3 large eggs
Using a handheld mixer, beat the mixture on medium speed for about 2 minutes until it’s well combined and smooth. This step is vital for a fluffy cake, as proper mixing incorporates air into the batter. If you’re feeling adventurous, try a homemade cake mix for a personal touch—there are plenty of recipes out there to guide you!
Preparing the cream cheese swirl
Now comes the creamy part—literally! In another bowl, soften 8 ounces of cream cheese (make sure it’s at room temperature) and mix it with:
- 1 cup of powdered sugar
- 1 teaspoon of vanilla extract
Mix until this concoction is smooth and fluffy. This cream cheese swirl will add that delightful richness to the cake, elevating it from basic to extraordinary.
Swirling the cream cheese into the batter
At this point, you should have both your cake batter and cream cheese mixture ready. Pour enough cake batter into the prepared baking dish to cover the bottom—about half of it should do. Then, spoon dollops of the cream cheese mixture over the batter. You can also add some fresh strawberries at this stage for extra flavor. Use a toothpick or a knife to gently swirl the cream cheese into the cake batter. The goal is to achieve a marbled effect, mixing just enough to see both the cake and cream cheese layers.
Baking the cake to perfection
Once you’ve created your masterpiece in the baking dish, it’s time to pop it in the oven. Bake for 30 to 35 minutes or until a toothpick inserted in the center comes out clean. Trust your instincts here; no one likes a dry cake! If you find the top is browning too quickly, you can cover it loosely with aluminum foil.
Making the strawberry glaze
While your cake is baking, let’s prepare the sweet glaze that will take your strawberry earthquake cake to the next level. In a small saucepan, combine 1 cup of fresh strawberries (chopped), ½ cup of sugar, and 2 tablespoons of lemon juice. Cook over medium heat until the strawberries break down and the mixture thickens, stirring occasionally. This should take about 10-15 minutes. If you’re interested in learning more about fresh fruit uses in baking, check out resources from The Joy of Cooking.
Drizzling the glaze and final touches
Once your cake has cooled slightly, pour the strawberry glaze over it while it’s still warm. Let it soak in for a delicious finish. You may wish to garnish your cake with additional fresh strawberries for that Instagram-worthy look. Now, slice a piece, take a moment to appreciate your creation, and savor every bite of your expertly baked Strawberry Earthquake Cake.
Enjoy your baking adventure! You’re not just making a dessert; you’re creating lasting memories.
Variations of Strawberry Earthquake Cake
Adding different fruit flavors
While the strawberry earthquake cake is delightful with its signature strawberry flavor, experimenting with other fruits can yield fantastic results. Why not swap strawberries for seasonal fruits like blueberries, raspberries, or even peaches? Each fruit brings its unique sweetness and tartness, creating a flavorful twist. For instance, a blueberry earthquake cake can provide a burst of juicy flavor, complementing the cake’s creamy texture beautifully.
Additionally, consider using a mix of fruits. A medley of strawberries and kiwi can create a vibrant, colorful dessert that not only tastes amazing but looks stunning on your table. Remember, when adding different fruits, adjust the sugar slightly to balance sweetness. For some ideas, check out this resource on fruit substitutions in baking from the American Institute for Cancer Research.
Exploring alternative frostings
The frosting on your strawberry earthquake cake plays a crucial role in the overall flavor experience. While cream cheese frosting is a classic choice, you could easily elevate your cake by trying different frostings.
- Whipped Cream Frosting: Light and airy, this option allows the cake’s fruity flavor to shine through.
- Chocolate Ganache: If you’re a chocolate lover, a rich ganache can add a decadent depth that pairs surprisingly well with strawberries.
- Lemon Zest Icing: For a citrusy kick, a lemon-flavored icing can provide a refreshing contrast, enhancing the fruitiness of the cake.
Personalize your strawberry earthquake cake with these variations and discover new favorites that will keep your dessert game exciting! What flavors will you choose next?
Baking Notes for Strawberry Earthquake Cake
Tips for perfecting the cream cheese mix
When it comes to creating that velvety cream cheese layer in your strawberry earthquake cake, start by ensuring your cream cheese is at room temperature. This makes it easier to blend smoothly without lumps. For added protein and creaminess, consider mixing in a bit of Greek yogurt. If you like a hint of sweetness, try adding a splash of vanilla extract—it makes all the difference. A tip from the experts: beat the cream cheese and sugar together until fluffy before folding in other ingredients; it elevates the texture!
Suggestions for ingredient substitutions
Feel free to get creative with your ingredients! If you don’t have strawberries on hand, any berry will work wonderfully—think blueberries or raspberries. For a gluten-free version, substitute all-purpose flour with a 1:1 gluten-free baking mix. You can also swap granulated sugar for coconut sugar for a more earthy sweetness. Lastly, for a buttery flavor without using butter, try coconut oil, which also adds a unique twist to this delightful cake.
For more baking tips, check out King Arthur Baking or Food52 for creative ideas!
Serving Suggestions for Strawberry Earthquake Cake
When it comes to enjoying your delicious strawberry earthquake cake, the right serving suggestions can elevate it to another level. Here are some delightful ways to enhance your cake experience:
Pairing with Fresh Fruits
Adding a medley of fresh fruits can create a colorful and refreshing balance to the richness of your cake. Consider slicing up:
- Strawberries: They complement the flavors beautifully.
- Blueberries: Their tartness adds a pleasant contrast.
- Bananas: These offer a creamy texture and sweetness.
Arrange these fruits on the side for a vibrant plate, or toss them on top for a stunning presentation. For more tips on fruit pairings, check out sites like Fruit & Veg!
Serving with Ice Cream or Whipped Cream
A scoop of creamy vanilla ice cream or a dollop of whipped cream can take your strawberry earthquake cake to new heights. Think about flavors that will harmonize with strawberries, such as:
- Vanilla: Always a classic choice.
- Strawberry Swirl: Goes perfectly with the existing strawberry flavors.
- Chocolate: For those who love a rich combination.
Serve each slice warm with a side of ice cream for a comforting treat. After all, who can resist that gooey center paired with cool, creamy goodness? Enjoy these combinations, and happy baking!
Tips for Making the Perfect Strawberry Earthquake Cake
Ensuring the Right Consistency
When it comes to achieving the perfect strawberry earthquake cake, consistency is key. Start by ensuring your cream cheese mixture is well-blended and free of lumps. This allows the cheese to swirl beautifully through the cake, creating those delightful “earthquake” fissures. A hand mixer can be your best friend here; it gives you the control needed to achieve that creamy texture. Additionally, be mindful of your cake batter; it should be thick but pourable, allowing for even spreading without losing the lightness of your sponge.
For the strawberry part, consider using ripe, fresh strawberries to enhance flavor. If they’re not in season, opt for high-quality frozen strawberries—just make sure to thaw and drain them well. This prevents excess moisture that could make your cake soggy.
Cooling the Cake for Better Slicing
Once baked, resist the urge to slice into your strawberry earthquake cake immediately. Allow it to cool in the pan for at least 20 minutes before transferring it to a wire rack. This crucial step helps the cake firm up, making it much easier to slice without crumbling.
Additionally, chilling the cake in the refrigerator for an hour can enhance the flavors and texture, creating a more enjoyable eating experience. Trust me, the wait will be worth it!
For more tips on cake cooling methods, check out The Kitchn’s expert guide. Happy baking!
Time Breakdown for Strawberry Earthquake Cake
When you’re getting ready to make a delicious strawberry earthquake cake, knowing how much time you’ll need can make everything flow smoothly. Here’s what to expect:
Preparation Time
You’ll want to set aside about 20 minutes to prepare your ingredients and mix everything together. This is the perfect time to get your kitchen prepped, and the delightful aroma of strawberries and cake mix will start to fill the air!
Baking Time
The baking process takes around 45 to 50 minutes. Just enough time for you to lounge around or maybe whip up a quick side dish. The key is to keep an eye on it as baking times can vary.
Total Time
All in all, your strawberry earthquake cake will take about 1 hour and 10 minutes from start to finish. A small investment for a dessert that’s sure to impress!
If you’re new to baking, this cake is a great way to practice your skills. Check out Baking Tips for Beginners for more insights that can help elevate your home baking!
Nutritional Information for Strawberry Earthquake Cake
When indulging in a delightful strawberry earthquake cake, it’s handy to know a bit about its nutritional profile. Here’s a quick look:
Calories per slice
A typical slice of this delicious cake contains approximately 350 calories. This makes it a sweet treat, and moderation is key if you’re keeping an eye on calorie intake.
Sugar content
With its rich flavors, a slice of strawberry earthquake cake delivers around 28 grams of sugar. While it’s not a health food, it satisfies those sweet cravings!
Fat content
This cake packs about 15 grams of fat per slice, primarily from the cream cheese and butter used in the recipe. If you’re looking for a bit of indulgence, this cake certainly delivers!
For more detailed information on sugar guidelines, check out the American Heart Association’s recommendations here. Always savor your treats wisely!
FAQs about Strawberry Earthquake Cake
How can I store leftover cake?
If you’ve created a delicious strawberry earthquake cake and find yourself with leftovers (which may be hard to believe!), proper storage is key to keeping it fresh. Place your cake in an airtight container or wrap it tightly with plastic wrap. It can be stored at room temperature for up to three days. If you want to extend its life, refrigerate it, which can keep it fresh for up to a week. For even longer storage, consider freezing individual slices. Just wrap them well and place them in a freezer bag – they can last for about three months!
Can I make this cake in advance?
Absolutely! This strawberry earthquake cake is perfect for making ahead of time. You can bake the cake one day in advance, let it cool fully, and then store it in the fridge. The flavors meld together beautifully, making it even more delicious. If you choose to freeze it, ensure it’s well-wrapped to prevent freezer burn. When you’re ready to enjoy it, simply thaw it overnight in the refrigerator and bring it to room temperature before serving.
What are some healthy substitutes for sugar?
Looking to reduce your sugar intake? You have plenty of options! Natural sweeteners like honey, maple syrup, or agave nectar can be excellent choices. Coconut sugar is another fantastic alternative that offers a lower glycemic index. If you’re interested in a more modern option, consider stevia or erythritol, which are both popular in healthier baking. Experimenting with these substitutes can give your strawberry earthquake cake a delicious twist without sacrificing sweetness!
For more tips on healthy baking, you might check out articles from the American Heart Association or the USDA’s dietary guidelines. Happy baking!
Conclusion on Strawberry Earthquake Cake
Why You Should Try Making It
If you haven’t yet experienced the joy of a strawberry earthquake cake, now’s the time to dive into this delightful recipe. With its luscious layers of chocolate cake, cream cheese, and juicy strawberries, it’s a sweet escape that’s perfect for any occasion. Not to mention, the preparation is simple enough to enjoy a fun cooking session with friends or family. You might just create a new tradition!
Final Thoughts on Homemade Desserts
Creating desserts at home brings a sense of fulfillment—there’s something incredibly rewarding about sharing a handmade treat. According to a study by the American Psychological Association, cooking can also reduce stress and boost happiness. Whether you’re a seasoned baker or just starting out, try your hand at this strawberry earthquake cake for a splash of creativity and joy in your kitchen. Discover more about the benefits of baking on sites like Psychology Today. Your taste buds and mood will thank you!
PrintStrawberry Earthquake Cake: The Best Indulgent Twist on Dessert

A delicious and indulgent twist on traditional dessert, this Strawberry Earthquake Cake is a perfect blend of flavors and textures.
- Prep Time: 15 minutes
- Cook Time: 45 minutes
- Total Time: 1 hour
- Yield: 12 servings 1x
- Category: Dessert
- Method: Baking
- Cuisine: American
- Diet: Vegetarian
Ingredients
- 1 box chocolate cake mix
- 1 cup water
- 1/2 cup vegetable oil
- 3 large eggs
- 2 cups fresh strawberries, sliced
- 8 ounces cream cheese, softened
- 1 box powdered sugar
- 1/2 cup chopped walnuts
- 1 cup grated coconut
Instructions
- Preheat your oven to 350°F (175°C).
- In a mixing bowl, combine the chocolate cake mix, water, vegetable oil, and eggs. Mix until well combined.
- Pour the batter into a greased 9×13 inch baking dish.
- In another bowl, mix the softened cream cheese with powdered sugar until smooth. Drop spoonfuls of the cream cheese mixture over the cake batter.
- Sprinkle the sliced strawberries, walnuts, and coconut over the top.
- Bake for 40-45 minutes or until a toothpick inserted into the center comes out clean.
- Let cool before serving.
Notes
- For extra flavor, you can add a splash of vanilla extract to the cream cheese mixture.
- Make sure to allow the cake to cool completely for the best texture.
Nutrition
- Serving Size: 1 slice
- Calories: 350
- Sugar: 30g
- Sodium: 200mg
- Fat: 15g
- Saturated Fat: 7g
- Unsaturated Fat: 8g
- Trans Fat: 0g
- Carbohydrates: 45g
- Fiber: 2g
- Protein: 4g
- Cholesterol: 60mg
Keywords: Strawberry Earthquake Cake, dessert, chocolate cake, indulgent desserts


