
Introduction to Turtle Bars
When it comes to homemade desserts, few treats can compete with the delightful charm of Turtle Bars. Named after the delectable turtles—those divine confections made of chocolate, caramel, and nuts—Turtle Bars douse you in nostalgia while offering a twist that’s both easy to make and unbelievably satisfying. But what exactly makes these bars a beloved choice for dessert lovers?
What are Turtle Bars?
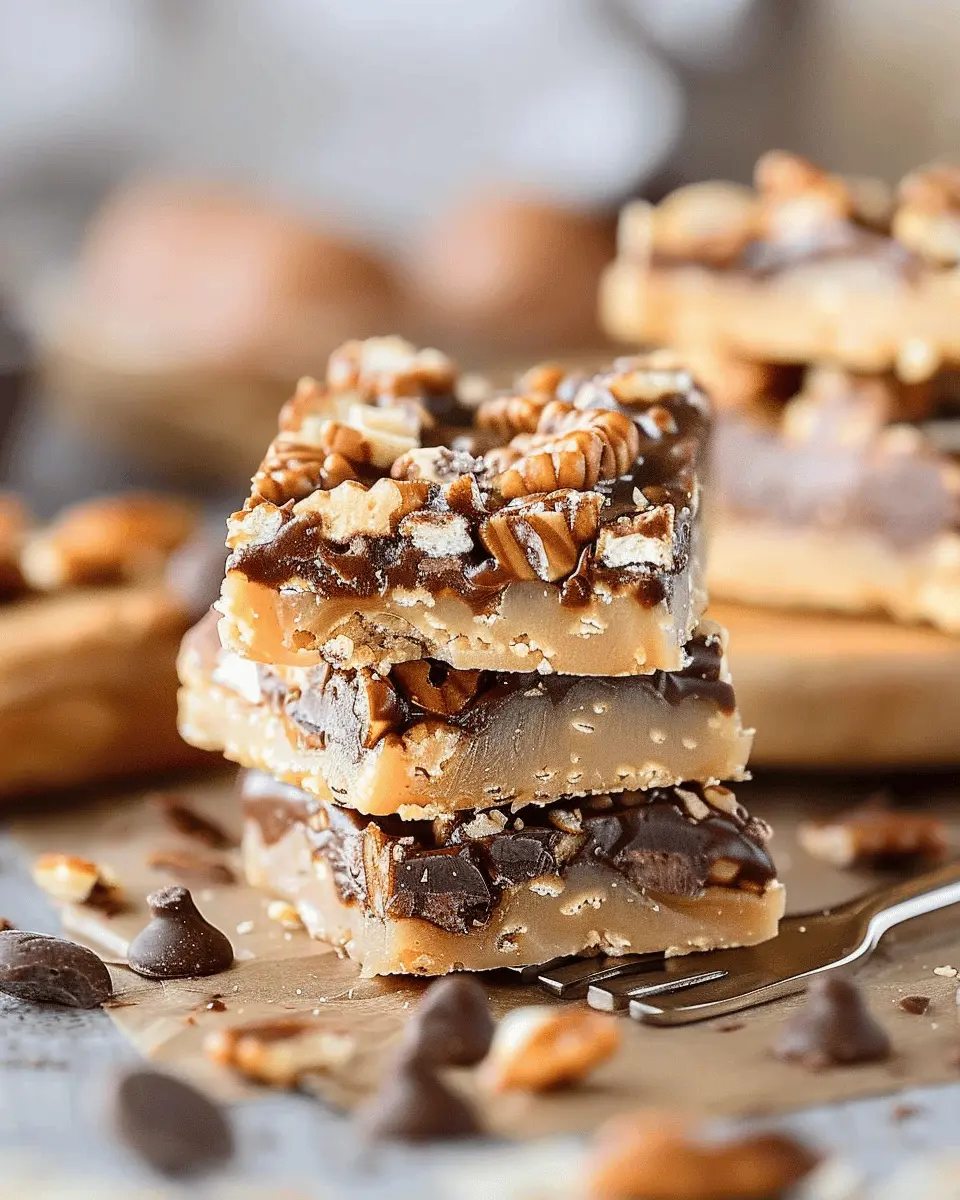
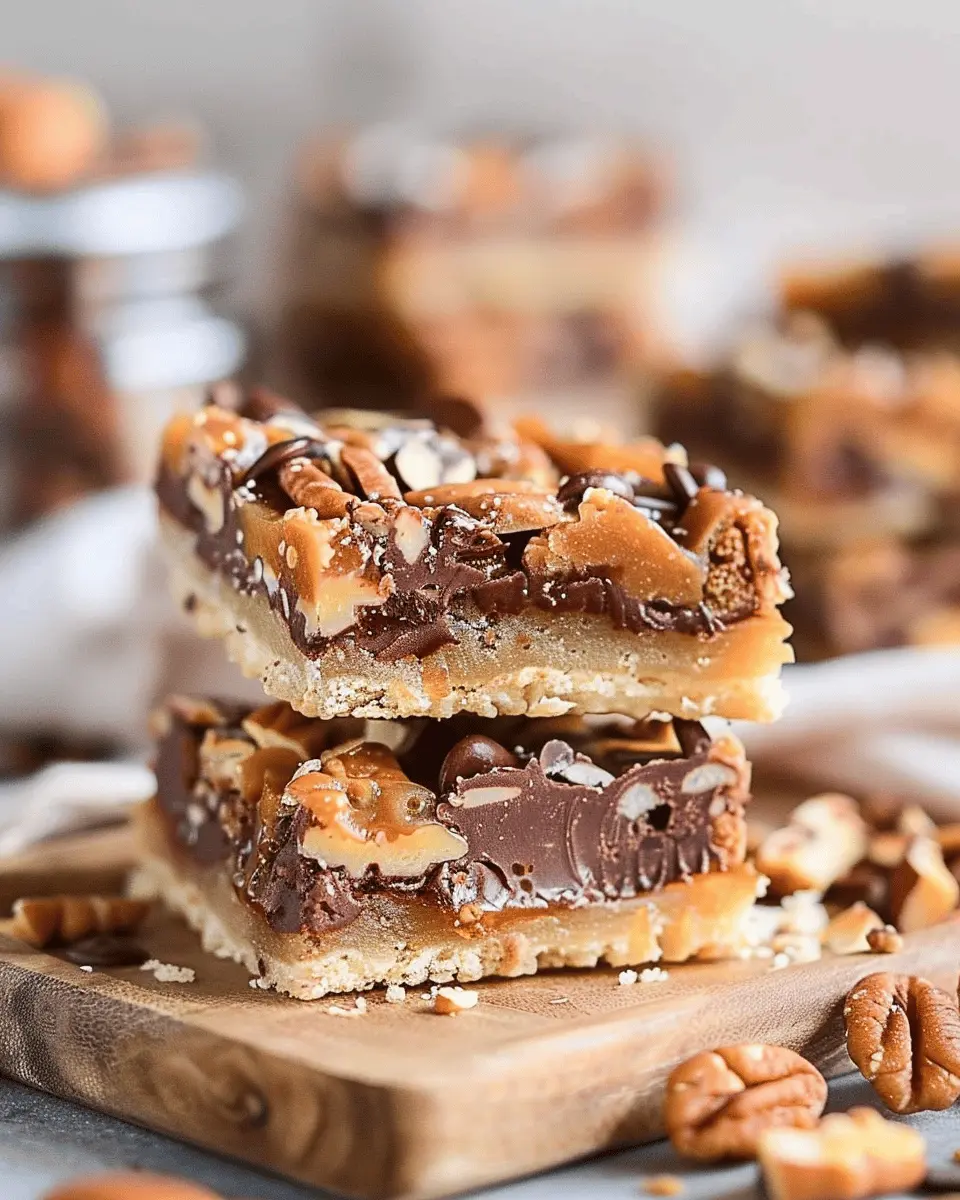
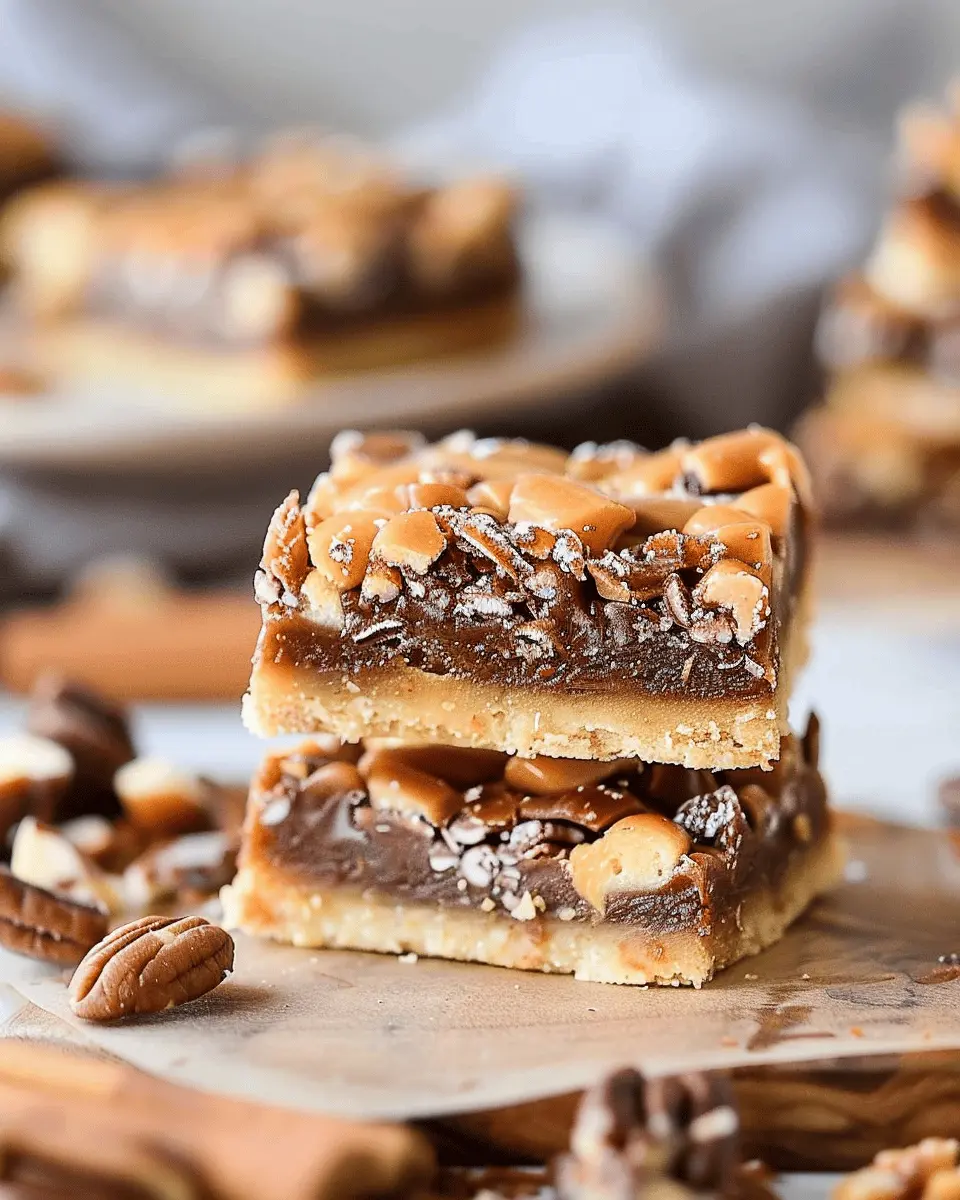
Turtle Bars combine the rich flavors of chocolate, crunchy nuts, and gooey caramel, all encased in a luxurious buttery crust. Usually made with simple pantry staples, these bars make a fantastic dessert for gatherings or a cozy night in. Unlike traditional cakes or cookies that require precision timing and decoration prowess, Turtle Bars bring the joy of baking back to its roots—quick, straightforward, and satisfying.
You might wonder, why are these bars particularly favored among homemade dessert lovers? Well, the answer lies in their versatility and ease. They can be modified to suit various tastes or dietary preferences; for instance, you can use gluten-free flour or dairy-free chocolate for a different spin. Plus, they require minimal cleanup, allowing you to focus more on the joy of dessert than on washing dishes.
Moreover, Turtle Bars are often adaptable to different occasions. Whether you’re hosting a game night or preparing treats for a holiday gathering, these bars fit seamlessly into any event. Many baking enthusiasts swear by them, citing their perfect balance of flavors and textures that keep you coming back for more.
Why are Turtle Bars a Must-Try?
Aside from their delicious taste, countless Instagram-worthy photos of Turtle Bars flood social media, inspiring many to give this recipe a go. With statistics showing that visually appealing desserts often get 60% more engagement online, why not take the plunge and become a part of the trend?
For a deeper dive into baking techniques and flavor combinations, you might enjoy baking blogs like Sally’s Baking Addiction or The Pioneer Woman for tips and tricks to elevate your Turtle Bars. So, are you ready to whip up a batch of these delicious treats? Your taste buds will thank you!
Ingredients for Turtle Bars
Essential ingredients for the perfect Turtle Bars
Creating delectable Turtle Bars starts with the right ingredients. Here’s what you’ll need to whip up these treat-filled delights:
- Graham cracker crumbs: The base for a perfect crust, adding crunch and a touch of sweetness.
- Unsalted butter: Helps bind the crust while providing richness.
- Sweetened condensed milk: This is essential for giving your bars that sticky, gooey texture.
- Chocolate chips: Semi-sweet works wonderfully, but dark chocolate can add a bold flavor.
- Chopped pecans: Traditional for Turtle Bars, these nuts provide a satisfying crunch.
- Caramel sauce: Drizzle generously for that irresistible sticky finish.
Optional ingredient additions for variety
Feeling adventurous? Elevate your Turtle Bars with these optional ingredients:
- Sea salt: A sprinkle on top can enhance flavors beautifully.
- Peanut butter chips: Mix them with chocolate chips for a delicious twist.
- Toffee bits: For an added layer of crunch and sweetness.
- Almonds or walnuts: Swap out pecans for a different nutty flavor.
With this combination of essential and optional ingredients, you can personalize your Turtle Bars to match your taste! For more tips on baking with chocolate, check out resources from esteemed culinary experts like Bon Appétit and Serious Eats. What will you add to make these bars uniquely yours?
Step-by-step Preparation of Turtle Bars
When you’re in the mood for something indulgent and sweet, Turtle Bars can do the trick. These delightful treats combine the flavors of chocolate, caramel, and pecans in an easy-to-manage bar format—perfect for sharing, or not! Ready to dive in? Here’s a step-by-step guide on how to prepare these mouthwatering bites.
Gather and Prepare Your Ingredients
Before we get started, ensure you have everything on hand. Here’s what you’ll need to create your Turtle Bars:
-
For the cookie base:
-
1 cup unsalted butter, softened
-
1 cup brown sugar
-
1/2 cup granulated sugar
-
2 eggs
-
1 teaspoon vanilla extract
-
2 cups all-purpose flour
-
1 cup chopped pecans
-
1 teaspoon baking powder
-
1 teaspoon salt
-
For the caramel layer:
-
1 cup caramel candies (about 30-35 pieces)
-
2 tablespoons heavy cream
-
For the chocolate topping:
-
1 cup semi-sweet chocolate chips
-
1 tablespoon vegetable oil
It’s a great idea to have your ingredients pre-measured before you start cooking. This way, you won’t scramble around the kitchen! If you’re keen on exploring substitutes, check out sites like Epicurious for inspiration.
Create the Cookie Base
Now, let’s whip up the cookie base that serves as the foundation for your Turtle Bars. Follow these easy steps:
- In a mixing bowl, cream together the softened butter, brown sugar, and granulated sugar until light and fluffy.
- Add in the eggs, one by one, mixing well after each. Don’t forget the vanilla extract!
- In a separate bowl, whisk together the flour, baking powder, and salt. Gradually add this dry mixture to the wet ingredients, stirring until just combined.
- Gently fold in the chopped pecans. This adds the delightful crunch that makes Turtle Bars so irresistible.
Prepare the Caramel Layer
While your cookie base is baking, it’s time to prepare the luscious caramel:
- In a saucepan over low heat, combine the caramel candies and heavy cream.
- Stir continuously until the mixture is smoothly combined. You want it to be drippable, but not too runny; think of a perfect drizzle for a dessert.
This homemade caramel can elevate the taste of your Turtle Bars significantly. Yes, you can buy pre-made, but there’s something special about making it yourself!
Melt the Chocolate Topping
Now for the final sweet layer! The chocolate topping gives your bars that classic turtle appeal:
- In a microwave-safe bowl, combine the chocolate chips and vegetable oil.
- Heat in increments of 30 seconds in the microwave, stirring in between, until melted and smooth. This keeps the chocolate glossy!
Assemble the Layers
By now, your cookie base should be golden and slightly cool. Here’s how to put it all together:
- Pour the caramel layer evenly over the cookie base.
- Next, drizzle the melted chocolate over the caramel layer, making sure to cover it nicely.
The interplay of these flavors is phenomenal. Can you already imagine that first bite?
Chill and Cut into Bars
Let your Turtle Bars chill in the refrigerator for at least 2 hours. This step is crucial as it helps everything set properly. Once they’re set, take a sharp knife and cut them into neat squares or rectangles—whatever floats your boat!
And there you have it—your delicious Turtle Bars are ready to be enjoyed or shared during your next gathering. They’re great for work snacks, dessert, or just a tasty pick-me-up. Feel free to add a sprinkle of sea salt on top for a little extra flavor enhancement!
For delicious variations or other dessert ideas, check out resources like the Food Network and embrace the world of dining creativity. Happy baking!
Variations on Turtle Bars
Turtle Bars with a Twist: Adding Nuts
If you’re a nut lover, why not enhance your Turtle Bars with some crunchy goodness? Adding nuts not only gives an extra layer of texture but also brings a delightful flavor twist. Here are some options to consider:
- Pecans: The classic pairing with caramel that adds buttery notes.
- Walnuts: They contribute a rich, slightly bitter contrast that works beautifully with the sweet profile of the bars.
- Almonds: For a touch of elegance and a satisfying crunch, slice almonds can be sprinkled on top or mixed into the base.
You could even consider toasting the nuts beforehand for an intensified flavor. The addition of nuts also increases the protein content, making your Turtle Bars feel a bit more substantial. Do you think you could resist the extra crunch?
Gluten-Free Turtle Bars Alternative
For those of you adhering to a gluten-free lifestyle, there’s good news! You can still enjoy the deliciousness of Turtle Bars. Simply swap out the regular flour for a gluten-free blend or almond flour. These flours help maintain the moistness of the bars while offering a nutty flavor that pairs beautifully with caramel and chocolate.
- Use Gluten-Free Flour: Look for a 1:1 baking blend that contains xanthan gum for binding.
- Almond Flour: Not only is it gluten-free, but it also provides healthy fats and protein.
This way, everyone can indulge in the sweet, chewy, and rich experience of Turtle Bars without any dietary concerns. Interested in more gluten-free recipes? Check out the resources at Gluten-Free Girl for fantastic ideas.
With these variations, your Turtle Bars can be as versatile as your taste buds allow! Who says you can’t have fun with dessert?
Cooking Tips and Notes for Turtle Bars
Common pitfalls to avoid when making Turtle Bars
Making Turtle Bars can be a delightful experience, but certain mistakes can sour the fun. One common pitfall is overbaking the crust; keep a close eye on it. Ideally, it should be lightly golden and not hard. Additionally, remember to let the layers cool before adding toppings. If they’re too warm, the chocolate or caramel might melt into a gooey mess rather than create those lovely layers. Lastly, when it comes to the pecans, toasting them beforehand enhances their flavor. But don’t let them go too far—burnt nuts can ruin your bars.
Storage tips for keeping your Turtle Bars fresh
To ensure your Turtle Bars stay fresh and tasty, wrap them in plastic wrap and store them in an airtight container. They can be kept at room temperature for up to a week. If you want to keep them longer, consider freezing them! Just make sure to place parchment paper between layers to prevent sticking. When ready to enjoy, thaw them in the fridge for the best texture. For more tips on storing baked goods, Food Network offers great insights on keeping treats fresh.
By avoiding common mistakes and using proper storage techniques, you’ll savor the deliciousness of your Turtle Bars longer!
Serving Suggestions for Turtle Bars
How to present your Turtle Bars for a perfect treat
When it comes to serving your delicious Turtle Bars, presentation is key. Start with a simple, elegant platter—rectangle or square works best to complement the bar shape. Cut them into even squares, and feel free to drizzle some extra caramel or chocolate sauce on top for that wow factor. Adding a sprinkle of sea salt can also create an appealing contrast and entice your guests even more. For a touch of freshness, consider placing a few mint sprigs nearby to brighten the display both visually and aromatic-wise.
Pairing suggestions for beverages that complement Turtle Bars
To elevate your Turtle Bars experience, consider serving them with complementary beverages. Here are some delightful options:
- Coffee: A bold cup of coffee brings out the rich chocolate and caramel flavors.
- Herbal Tea: A soothing chamomile or mint tea can provide a calming balance to the sweet bars.
- Sparkling Water: The effervescence of sparkling water refreshes the palate perfectly.
- Milk: Classic cold milk remains an unbeatable and nostalgic companion to any sweet treat.
By keeping these serving ideas in mind, you’ll create an inviting dessert experience that is sure to impress. For more inspiration on serving desserts, check out The Spruce Eats.
Time Breakdown for Turtle Bars
When you’re ready to whip up some delightful Turtle Bars, it’s crucial to know how long you’ll spend in the kitchen. Here’s a quick look at the time you’ll need to create this delicious treat.
Preparation Time
Preparing your Turtle Bars takes about 20 minutes. This includes gathering your ingredients and mixing the buttery base. Pro tip: having everything out makes the process smoother and more enjoyable!
Cooking Time
The baking will take around 25-30 minutes. That’s the time to give your Turtle Bars a perfect golden finish. Keep an eye on them to avoid over-baking!
Total Time
In total, you’re looking at about 50-60 minutes from start to finish. Not too bad for a dessert that will impress your friends and family! If you’re interested in more quick desserts, check out this resource for inspiration.
Enjoy making your Turtle Bars, and get ready for a sweet reward!
Nutritional Facts for Turtle Bars
Calories per bar
A single Turtle Bar packs about 250 calories, making it a delightful treat perfect for an afternoon pick-me-up. It strikes a balance between indulgent snacking and moderate calorie intake, ideal for young professionals who are always on the go and looking to satisfy their sweet cravings without guilt.
Sugar and fat content
Each bar contains approximately 15 grams of sugar and 12 grams of fat. While the sugar gives that sweet, caramel-like experience, it’s essential to enjoy these bars in moderation. You can opt for alternatives like using nut butter or oats to tweak the recipe, further customizing the taste and nutritional profile. Check out sources like Healthline for more insights on how sugar and fats impact your health.
Potential allergens and substitutes
When making Turtle Bars, be aware of potential allergens. They often contain nuts and dairy. If you’re hosting pals who have allergies, you might consider substitutes like gluten-free oats or dairy-free chocolate chips. There are plenty of resources available online to help navigate these substitutions, ensuring everyone can enjoy this delectable treat without worry.
Whether you’re munching on them while tackling your workload or enjoying them as dessert after a healthy dinner, Turtle Bars offer a delicious way to satisfy your sweet tooth!
FAQs about Turtle Bars
Can I make Turtle Bars in advance?
Absolutely! Turtle Bars can be prepared a day or two ahead of time. The flavors often deepen as they sit, and this can enhance the overall taste experience. Just make sure to let them cool completely before cutting and storing them in an airtight container.
What is the best way to store leftovers?
To maintain that delightful texture, store your leftover Turtle Bars in an airtight container at room temperature for up to three days. If you want to keep them longer, consider refrigerating them. Just be sure to separate layers with parchment paper to prevent sticking. For extended storage, you can freeze them for up to three months! When you’re ready to enjoy them, let them thaw at room temperature.
Can I use different types of chocolate?
Yes, feel free to get creative with the types of chocolate you use in your Turtle Bars. Whether it’s dark, milk, or white chocolate, each variety will impart its own unique flavor. Not only can you substitute chocolate types, but you can also use chocolate chips, bars, or even chocolate spreads for different textures. Personally, I love combining dark and milk chocolate for a rich yet balanced taste. Curious for ideas? Check out this resource on chocolate pairing for baking.
In conclusion, Turtle Bars are not only versatile in flavor but also flexible when it comes to preparation and storage. So go ahead, make a batch today, and savor the deliciousness!
Conclusion on Turtle Bars
Why Turtle Bars are a must-try for homemade dessert enthusiasts
Turtle Bars are an irresistible delight that every dessert lover should explore. These bars fuse the rich flavors of chocolate, caramel, and nuts, creating a taste explosion that makes every bite memorable. Not only are they simple to make, but they also allow you to impress friends and family with minimal effort.
- Their gooey texture and crunchy toppings make them visually appealing, perfect for sharing.
- Plus, Turtle Bars are customizable; you can easily swap in your favorite nuts or adjust the sweetness!
So next time you’re craving something sweet, why not try these decadent Turtle Bars? Trust us, your taste buds will thank you! For more dessert inspirations, check out resources like Epicurious or Bon Appétit.
PrintTurtle Bars: The Best Indulgent Treat for Homemade Dessert Lovers
These Turtle Bars are the perfect indulgent treat for those who love homemade desserts. With a rich combination of chocolate, caramel, and nuts, they are sure to satisfy any sweet tooth.
- Prep Time: 15 minutes
- Cook Time: 30 minutes
- Total Time: 45 minutes
- Yield: 12 bars 1x
- Category: Dessert
- Method: Baking
- Cuisine: American
- Diet: Vegetarian
Ingredients
- 1 cup all-purpose flour
- 1/2 cup unsweetened cocoa powder
- 1/2 cup brown sugar
- 1/2 cup granulated sugar
- 1/2 cup butter, softened
- 1 cup chocolate chips
- 1/2 cup chopped pecans
- 1 cup caramel sauce
- 1/4 teaspoon salt
Instructions
- Preheat your oven to 350°F (175°C).
- In a large bowl, cream together the butter and sugars until light and fluffy.
- Add the flour, cocoa powder, and salt, mixing until just combined.
- Fold in the chocolate chips and pecans.
- Spoon the mixture into a greased baking pan and spread evenly.
- Drizzle caramel sauce over the top.
- Bake for 25-30 minutes, or until set.
- Let cool before cutting into bars.
Notes
- For an extra indulgent touch, top with more chocolate chips before baking.
- These bars can be served warm or at room temperature.
Nutrition
- Serving Size: 1 bar
- Calories: 250
- Sugar: 18g
- Sodium: 150mg
- Fat: 12g
- Saturated Fat: 7g
- Unsaturated Fat: 4g
- Trans Fat: 0g
- Carbohydrates: 35g
- Fiber: 2g
- Protein: 3g
- Cholesterol: 30mg
Keywords: Turtle Bars, homemade dessert, indulgent treat


